JinnIde is the Jinni Prolog IDE Plugin for JEdit. From the Cassandra release onwards,
Jinni Prolog code development is organized into projects - which has turned out to be very practical and is thus
more or less common practice in modern IDEs.
The following explains
- how to create a project
- how to create a package
- how to work with the project viewer
How to create a project
Creating a Jinni Prolog project is simple - it's all done within the confines of a GUI:- Open up the template viewer or pull down the Templates menu and click on Create project
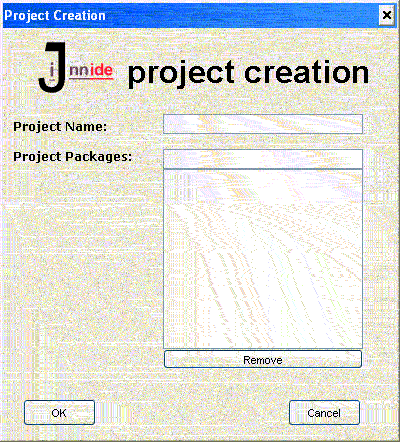
- The GUI is displayed:

- The dialogue is simple and straightforward - you only type in the name of the project and the packages supposed to be below the project. Press return at the end of each package name you type so that it is listed in the list view below the package name text field. JinnIde uses a static project directory structure allowing the developer to organize her/his code into packages, classes, modules, data and UML design files
- By providing a project name and (at least) a package name in the corresponding text fields and pressing OK is all you need to create a project.
Packages, classes, modules, data and UML design
Let's see what this project directory structure that JinnIde creates for us is all about by taking a quick look at each of its organization units:- packages: this is the next-to-lower organization unit below the project directory. In contrast with e.g. Java, a JinnIde package does not have further packages below. Instead other, static organization units according to the type of Jinni Prolog code (modules,classes, programs) follow
- classes: below a package is a directory called _classlib where all the class files of the package reside
- modules: below a package is a directory called _modulelib where all the module files of the package reside
- programs: below a package is a directory called _proglib where all the program files of the package reside
- data: below a package is a directory called _datalib where all the data files (e.g. prolog databases) of the package reside
- UML design: below a package is a directory called _umldoc where all the UML design files (e.g. Poseidon .zuml files) of the package reside; note that JinnIde does not include a UML tool but supposes that you will want to keep your UML design files together with the project so that you may view your UML design by initiating a viewer to the respective file from within JinnIde's project viewer
What does JinnIde do for you?
- it creates the initialization files (always called init, so easy to find when you want to define there some project-specific setting) that set the classpaths required for classes and modules
- it adds a link from JEdit's startup directory Jinni Prolog initialization file (again, also called init) to the project's initialization file
- it creates the above mentioned directory structure including doc directories where JinniDoc's HTML files are kept
- it executes the initialization files to have the new classpaths available in the running session
Note that when you want to delete the project, this is so simple because it's easiest to do in a file explorer - either from within JEdit or using the operating system's own means. That's why JinnIde does not care about a project deletion feature.To delete the project it is enough to delete the link in JEdit's startup directory i.e. the Jinni Prolog initialization file and the directory with the name of the project - that's all! The deleted project's classpaths only remain throughout the running session where the initializations took place, which does not hurt because there is not anything supposed to be there.
How to create a package
Creating a Jinni Prolog package is simple as well - again, it's all done with a GUI:- Open up the template viewer or pull down the Templates menu and click on Create package
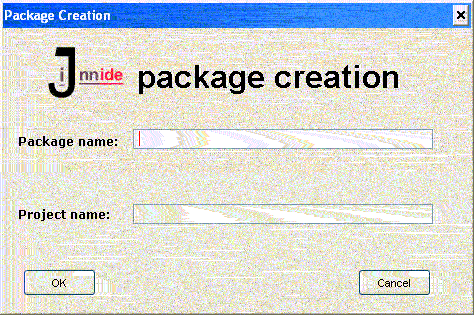
- The GUI is displayed:

- Type in the name of an existing project and the package supposed to be added to the project. Press OK and JinnIde does all the rest for you: it creates the package initialization file that set the classpaths required for classes and modules, it adds a link to the corresponding project initialization file,it creates the package directory structure and, finally, it executes the initialization file to have the new classpaths available in the running session
How to work with the project viewer
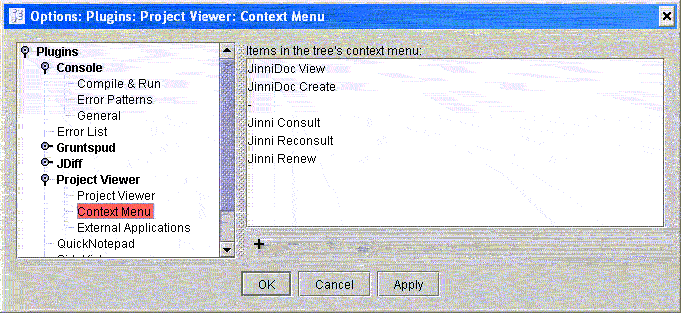
The project viewer works as known for other project types, so please take a look at its documentation. The following focuses on outlining JinnIde's special extensions that equip it with additional, JinnIde-specific functionality. Each JinnIde function that makes sense for the project viewer's right-click menu is also delivered in a compatible version. To edit the project viewer's right-click menu, go to the plugins menu and select plugin options to locate the project viewer option menu which looks like that when all of JinnIde's project viewer compatible functionality is activated there: Note that, although there seems to be more JinnIde functionality when adding
an item with '+', the other functions are not devised for the project viewer.
To recognize which item is compatible with the project viewer the prefix
'Jinni Prolog' has been used as short denotation. Although 'Jinni Prolog Project Viewer'
would have been a more explicit prefix, it has been avoided because these labels
also directly appear in the right-click menu as can be seen in the
following screenshot.

JinnIde's project viewer menu items offer the following functionality:
- JinniDoc View: show the corresponding documentation which was generated or dated up by JinniDoc (fails if not)
- JinniDoc Create: generates or dates up the JinniDoc documentation of the right-clicked file or generates/dates up the documentation of a project or directory if the menu item is a directory-sort-of item e.g. '_modulelib'
- JinniConsult / JinniReconsult: consult/reconsult the right-clicked file or directory
- Jinni Prolog Renew: renew a class or module when the right-clicked file is a module/classs